


Making chocolate is not as simple as melting the chocolate bar and cooling it down. Professional Chocolate Work includes knowledge of Cocoa, Ingredients, Temperature, Texture, Flavour balance, moulding, and Tempering. For novices, the basic elements of chocolate making can make it significantly easier and more reliable to create chocolate. If you’re looking for recipes for making chocolate, you should begin by learning about its ingredients and how chocolate is made. The quality of the cocoa beans, cocoa butter, and the moulding and finishing of the beans all influence the final product. With a grasp of the fundamentals, novices can work up to mastering the techniques of truffles, bonbons, pralines, decorations, and other advanced pastry crafts.
What Is Chocolate Made From?
Before making chocolate, it is important to know the basic ingredients of chocolate. Traditional chocolate is made with cocoa-based ingredients and sugar, as well as milk ingredients and flavourings, which are different depending on the type.
The main ingredients include cocoa beans, cocoa mass or cocoa liquor, cocoa butter and sugar. Milk chocolate is also made with milk powder, and sometimes vanilla or flavours are added to enhance the taste. Lecithin may be added as an emulsifier for added flow and consistency.
The proportions vary according to the type of chocolate. Typically, dark chocolate has a higher cocoa content, and milk chocolate has milk. White chocolate contains cocoa butter and not cocoa solids.
Types of Chocolate
- Dark Chocolate: It primarily consists of cocoa solids, cocoa butter, and sugar.
- Milk Chocolate: It contains cocoa ingredients, sugar, and milk powder.
- White Chocolate: White chocolate is made from cocoa butter, sugar, and milk ingredients.
- Couverture Chocolate: A chocolatier’s chocolate, relatively rich in cocoa butter content, suitable for use in melting, moulding and coating.
The fluidity and the cocoa butter content of couverture chocolate make it suitable for finishing and moulding applications in professional pastry kitchens.
How Is Chocolate Made from Cocoa Beans?
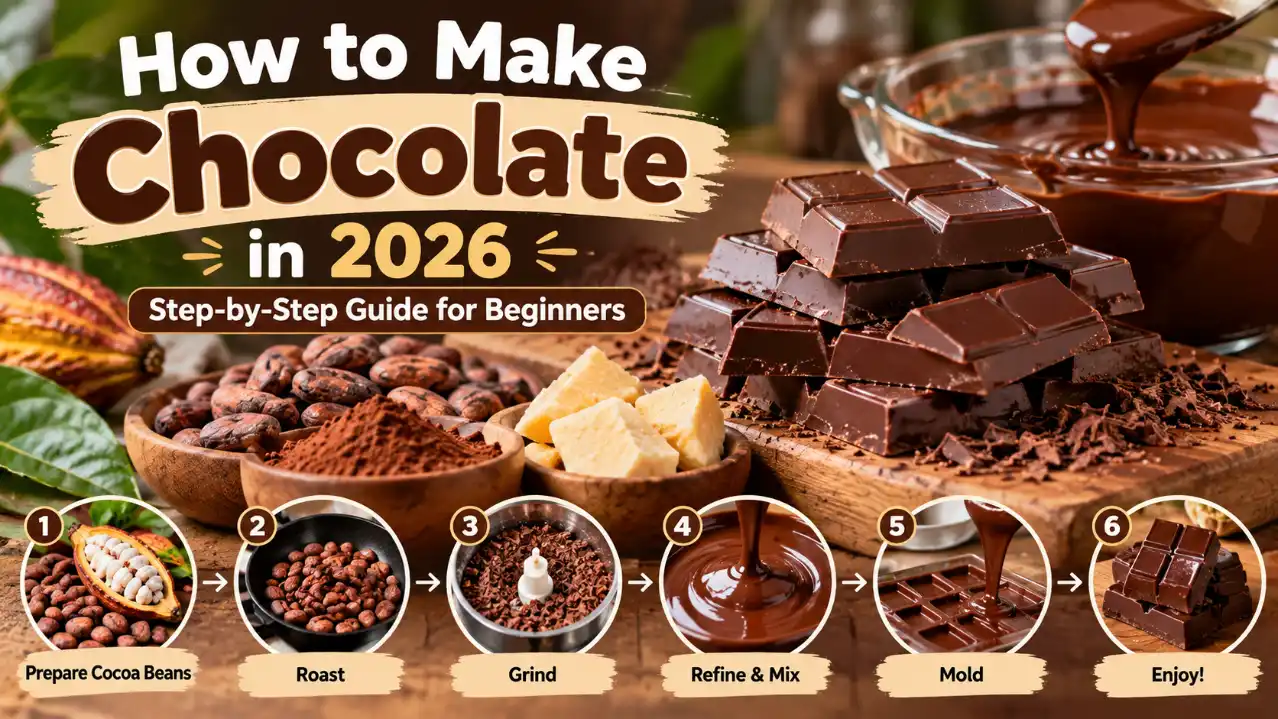
Much before a chocolate can reach a kitchen, the process of commercial chocolate making is already underway. It starts with cocoa pods of cocoa trees. The beans are taken out of the pods and fermented for several days, which brings some essential flavor to the beans. They are then dried to minimize water content prior to further processing.
Cocoa beans are roasted during the manufacturing process to develop the flavour. The beans are roasted, cracked, and winnowed to remove the shells and produce cocoa nibs. The nibs are milled to form what is known as cocoa liquor or cocoa mass.
Cocoa liquor may then be mixed with cocoa butter, sugar and other ingredients as required for the chocolate formulation. The refining and conching equipment is used in the manufacture of the product to enhance particle size, texture and flavour. The process of making chocolate on an industrial scale.
Typically, it is not the same when making pastry for students or home learners. Typically, they start with ready cocoa powder, cocoa mass, or couverture chocolate rather than raw cocoa beans.
Ingredients You Need to Make Chocolate
For a simple beginner’s preparation, a few strategic ingredients may be used:
- Cocoa powder or cocoa mass.
- Cocoa butter
- Finely ground or powdered sugar
- You can use milk powder as a milk substitute in milk chocolate.
- Vanilla extract or vanilla powder.
- Dried Fruit or flavourings (optional nuts)
The quality of the ingredients affects the taste, smoothness, shine, and texture of the chocolate. A pro tip is to use good cocoa products and ensure accurate measurements. The final consistency can be altered even with a small adjustment in the ratio of cocoa butter, cocoa solids and sugar.
How to Make Chocolate Step by Step
The elements of chocolate preparation and temperature control are crucial in learning how to make chocolate at a basic level. The following process can be used as an introduction to chocolate work.
Step 1: Prepare the Ingredients
Always use measuring instruments to measure ingredients before starting preparation. Ensure all equipment, bowls, and molds are perfectly clean and dry. Melted chocolate should not come into contact with water, as it can thicken and become grainy with the addition of a few drops.
Step 2: Melt the Cocoa Butter
Melt the cocoa butter in a heatproof bowl over a double boiler and heat gently. Controlled heating is essential as more heat will impact on ingredients, and later on in the process, it may make temperature control more challenging.
Slowly heat and stir until the cocoa butter has all melted.
Step 3: Add Cocoa and Sugar
Gradually add cocoa powder or cocoa mass to the melted cocoa butter. Add powdered sugar and stir well.
Milk powder may be added to the milk chocolate preparation. Continue to stir so that the ingredients are evenly distributed and do not lump.
Step 4: Mix Until Smooth
Mix until as smooth and even as possible. A basic preparation can still be different from commercially made chocolate in terms of texture.
Refining and conching machinery are used by professional manufacturers to ensure a very fine particle size and smooth mouthfeel. For beginners, they can concentrate initially on accurate quantities of ingredients and careful mixing.
Step 5: Temper the Chocolate
One of the most crucial steps in the art of professional chocolate is tempering. Includes controlled heating, cooling, and reheating to promote the formation of stable crystals of cocoa butter.
To achieve a nice shiny finish, smoothness, good snap, and ease of moulding, the correct tempering is essential. The shape of the temperature curve will vary depending on the type of chocolate used. In other instances, like dark, milk chocolate and white chocolate, professionals usually rely on a certain temperature range as opposed to a single temperature for all types of chocolate.
Step 6: Pour into Moulds
When it has been brought to the correct working state, pour it into clean, completely dry moulds. Gently tap the mould to remove trapped air and for a more uniform finish.
Step 7: Let the Chocolate Set
Let the moulded chocolate cool and crystallize well. Avoid disturbing the mould while the chocolate is setting. When perfectly set, gently cut the chocolate out of the mould and check the chocolate surface for shine, smoothness, and clean edges.
Why Is Chocolate Tempering Important?
The need for chocolate tempering is due to the fact that the cocoa butter may crystallize in various forms. Controlled tempering promotes the development of stable crystals that contribute to the properties chocolate should have in finished, manufactured chocolate. A well-tempered chocolate will be shiny on the outside with a good snap and clean break.
It also shrinks when it chills, making it simpler to take the moulded chocolate out of the mould. Chocolate can become dull, streaky, or go soft if it is not tempered properly. It can also be more likely to melt or may not be easily removed from moulds.
The tempering process can sound technical, but is easier for beginners to understand after practice, using a chocolate tempering thermometer and appropriate chocolate.
Common Chocolate-Making Mistakes Beginners Should Avoid
There are a couple of common issues that can help beginners improve their chocolate-making process. The errors are also good points for students progressing towards chocolate-making careers.
- Overheating Chocolate: Excessive heat can affect the texture and flavour. Avoid using high temperatures; use controlled heating.
- Allowing Water into Chocolate: Water can cause melted chocolate to seize. Ensure that bowls, utensils and moulds are dry.
- Skipping Tempering: When using chocolate to prepare a moulding or to coat the product, it may be necessary to temper the chocolate; otherwise, it may not be shiny or snappy or stable.
- Using Low-Quality Ingredients: Cocoa, cocoa butter and chocolate have an impact on the flavour and final texture.
- Incorrect Storage: End products of chocolate should be stored in a cool, dry place, out of direct sun, away from humidity and strong odours.
Professional training can assist students to grasp the concepts of temperature control, ingredient behaviour and troubleshooting rather than just a recipe.
What Can You Make After Learning Basic Chocolate Making?
With an understanding of melting, mixing, tempering and moulding, chocolate can be used in a variety of pastry applications. Chocolate lovers can make their way up from a basic version of chocolate bars to truffles, pralines, bonbons, ganache, moulded chocolates and chocolate fillings. Chocolate can also be a key ingredient in cakes, pastries, plated desserts and decorations.
As skills are developed, learners can explore various flavors, textures, mould shapes and finishes. By knowing the basics first, it will give you a better starting point for the more advanced confectionery work.
Learn Professional Chocolate Making with Chef IBCA
In the world of professional chocolate making, it’s not enough to just know a recipe. It requires very accurate temperature control, knowledge of ingredients, moulding skills, presentation, consistency, and repeated practical application. These skills can be cultivated in a structured environment through culinary and bakery training, and can also be developed by aspiring pastry chefs in this way.
Currently, IBCA offers bakery and pastry training that includes hands-on experience with chocolate and confectionery techniques such as moulding, tempering, making truffles, and creating ganache. The same is true of its 6-month Diploma in Baking and Pastry Arts program, which includes both hands-on and academic instruction.
Looking to hone your baking and pastry skills? Learn about Chef IBCA’s bakery and pastry courses and get hands-on experience in the professional kitchen.
FAQs About How to Make Chocolate
Can I make chocolate using cocoa powder?
Yes. To make a basic preparation for chocolate, cocoa powder can be mixed with cocoa butter, finely ground sugar, and other ingredients. Professionally manufactured chocolate, however, is industrially refined and conched, which can change the texture of the chocolate.
What causes homemade chocolate to melt?
Why does homemade chocolate sometimes become soft?
Improper tempering, an incorrect cocoa butter mix, or warm storage cause soft chocolate. For moulding or coating, the chocolate must be well-tempered and stored properly to obtain improved stability.
What is the difference between melting and tempering chocolate?
Melting simply changes chocolate from a solid to a liquid, while tempering is a controlled process to manage cocoa butter crystallisation. The tempering process enhances chocolate shine, snap, stability and mould release.
Which chocolate is best for professional baking?
Couverture chocolate is often used by pastry and chocolate makers due to its superior fluidity, melting and finishing properties, which are often caused by the increased cocoa butter content. Depending on use and manufacturer’s guidelines, the correct chocolate is also determined.
Is chocolate making difficult for beginners?
The most basic of chocolate-making skills can be learnt by beginners, but more advanced skills like tempering, moulding, pralines and other finishing techniques need practice. One of the key factors to consider is controlling the temperature, as minor variations can impact texture, appearance and stability.
Conclusion
Making chocolate is the combination of ingredients, technique and temperature control. The beginner should first learn about the cocoa products, select appropriate ingredients and practice simple melting and moulding. Once confidence is gained, techniques like tempering, ganache and truffle making and professional finishing can be added. This is done by ensuring that you are consistent instead of rushing. Structured practical training can help aspiring bakers and pastry students to better understand the behaviour of chocolate and the application of professional techniques in the real kitchen. IBCA provides bakery and pastry courses for home bakers as well as students seeking a career in pastry.